Post Content
Author: NA4DA
-

New Book Release: Satellite Operating for Amateur Radio
Ever wanted to operate amateur radio satellites but felt intimidated by tracking the “birds” or unsure about the equipment needed? ARRL The National Association for Amateur Radio®’s new book, Satellite Operating for Amateur Radio, is now shipping and shows just how approachable, exciting, and rewarding satellite communication can be.
Written by Tony Milluzzi, KD8RTT, the book offers a clear step…
-
2025 Bill Orr, W6SAI, Technical Writing Winners Awarded
The ARRL Foundation’s 2025 Bill Orr, W6SAI, Technical Writing Award has been awarded to Dr. Ethan Miller, K8GU, and Dr. Nathaniel A. Frissell, W2NAF, for their August 2025 QST article, “About Traveling Ionospheric Disturbances.”
The editors of QST nominated Miller and Frissell in August 2025, the ARRL Foundation Board approved the awards in January 2026, and the award plaques were distributed to…
-
Ham Radio Portable Insights: Reasons to Consider an End-Fed Half-Wave Antenna
Plus, WG8X takes a look at a couple of great POTA antenna options— the Spooltenna Parks EFHW4010 and the new DX Engineering TWIG EFHW Feedpoint Kit.
***
Hi everyone, this time let’s talk a little bit about end-fed half-wave antennas (EFHW). I’ve been using them for a few years, ever since a friend gifted one to me.
My plan for this article is not to deep dive into the physics behind it or turn you into electrical engineers. Rather, I want to share some info about them and maybe light a fire under you to perhaps try using or building one of your own.
The big advantage I’ve found using an EFHW in the field is you can pull up to a site and literally be on the air in moments with barely any tuning or fuss. You can tie off the impedance transformer to a handy post or tree a few feet above the ground and then toss the wire over a convenient limb. When camping, I use my fiberglass telescopic mast attached to the hitch mount on the truck or camper. The possibilities are absolutely endless.
An EFHW is a variation of the half-wave dipole. Both use a half-wave resonant length wire. The primary difference is the feedpoint. Where a standard dipole is fed at the center (low impedance), the EFHW is fed at the end (high impedance) using a 49:1 or 64:1 transformer.
The amount of wire attached is a ½ wave on the lowest band of interest. For instance, a 66-foot wire is a half wave at 40M, a full wave at 20M, three half waves at 15M, and a double full wave at 10M. The 40 to 10M seems to be a popular configuration for this antenna.
There is a lot of information on the web and in print about EFHWs. One source I recommend is this video by Peter Waters, G3OJV.
Peter has a commonsense approach to the EFHW. Some of the takeaways from his video are:
- A counterpoise is not needed. If you believe that it is then feel free to try it for yourself.
- Your EFHW doesn’t have to run in a straight line. You can route the antenna whichever way works best for your installation. Yes, it will change your radiation pattern somewhat, but it will still work and you will still make contacts.
As Peter seems to be fond of saying, “we are amateurs, not professionals.” Don’t be afraid of experimenting—you may be surprised at the results.
The EFHW which was gifted to me by a friend uses a double stacked core. The advantage to double (or triple) stacking cores is that it allows for higher power.

Double stacking the ferrite cores for higher power capability. (Image/WG8X) I’ve run this one at 100W CW for hours with no issues. I was told that they are a real pain to wind, but well worth the time. It uses #14 or #12 enameled wire. Lighter wire can be substituted if you are planning to run QRP or are trying to save weight. An afternoon at “YouTube university” will yield much more information about winding your own.
I spent some time looking at the EFHWs available from DX Engineering and bought a couple that interested me.
First was the Spooltenna Parks EFHW4010. I’m really impressed with this one. Its small size fits easily into a backpack, and the manufacturer says it can handle up to 100W SSB (50W CW). The field test sheet that’s included shows the measurements that were taken on that specific antenna.

The Spooltenna Parks EFHW4010 deployed at a campsite. (Image/WG8X) I installed mine inverted-V style using a mast extended to around 25 feet. The far end of the antenna ran out to a convenient tree. Checking the SWR with my RigExpert antenna analyzer yielded results consistent with what I saw on the field test sheet.
It performs as you’d expect from an EFHW. It has turned into my go-to antenna for a recent camping trip and will find a place in my POTA Go-Box.
The next antenna I tried was the DX Engineering TWIG EFHW QRP Antenna Feedpoint Kit. It couldn’t be any simpler to set up:
- Open the package
- Attach your wire to it
- Toss the wire over a convenient support
- Hook the TWIG to your rig
- Make contacts!

TWIG EFHW QRP Antenna Feedpoint Kit (Image/DX Engineering) For QRP operations, this antenna is absolutely the simplest and smallest I’ve seen so far.
The connector for the wire at the balun end is similar to the WAGO connectors that I’ve used in the past; simple! The power rating is only 25W SSB/10W CW/5W Digital, so let’s leave those amplifiers at home.
Lastly, let’s talk about your Go-Box. Part of the fun for a lot of people is experimenting with antennas while out in the field. For that you really need an antenna Go-Box. My box contains:
- Multiple lengths of rope
- Spare feedline
- Spare antennas
- Arborist weight
- An assortment of RF connectors
- Spare wire

Contents of a typical antenna Go-Box. (Image/WG8X) 
More contents for an antenna Go-Box. (Image/WG8X) Everyone’s Go-Box will be different, but if you frequently head out to the field, you really need one.
And that’s it for now. In an upcoming article, we’ll talk about fast and easy ways to deploy your portable antennas. For now, you know what I’m going to say. That’s right—let’s get out there and activate something!
73 DE WG8X
The post Ham Radio Portable Insights: Reasons to Consider an End-Fed Half-Wave Antenna appeared first on OnAllBands.
-
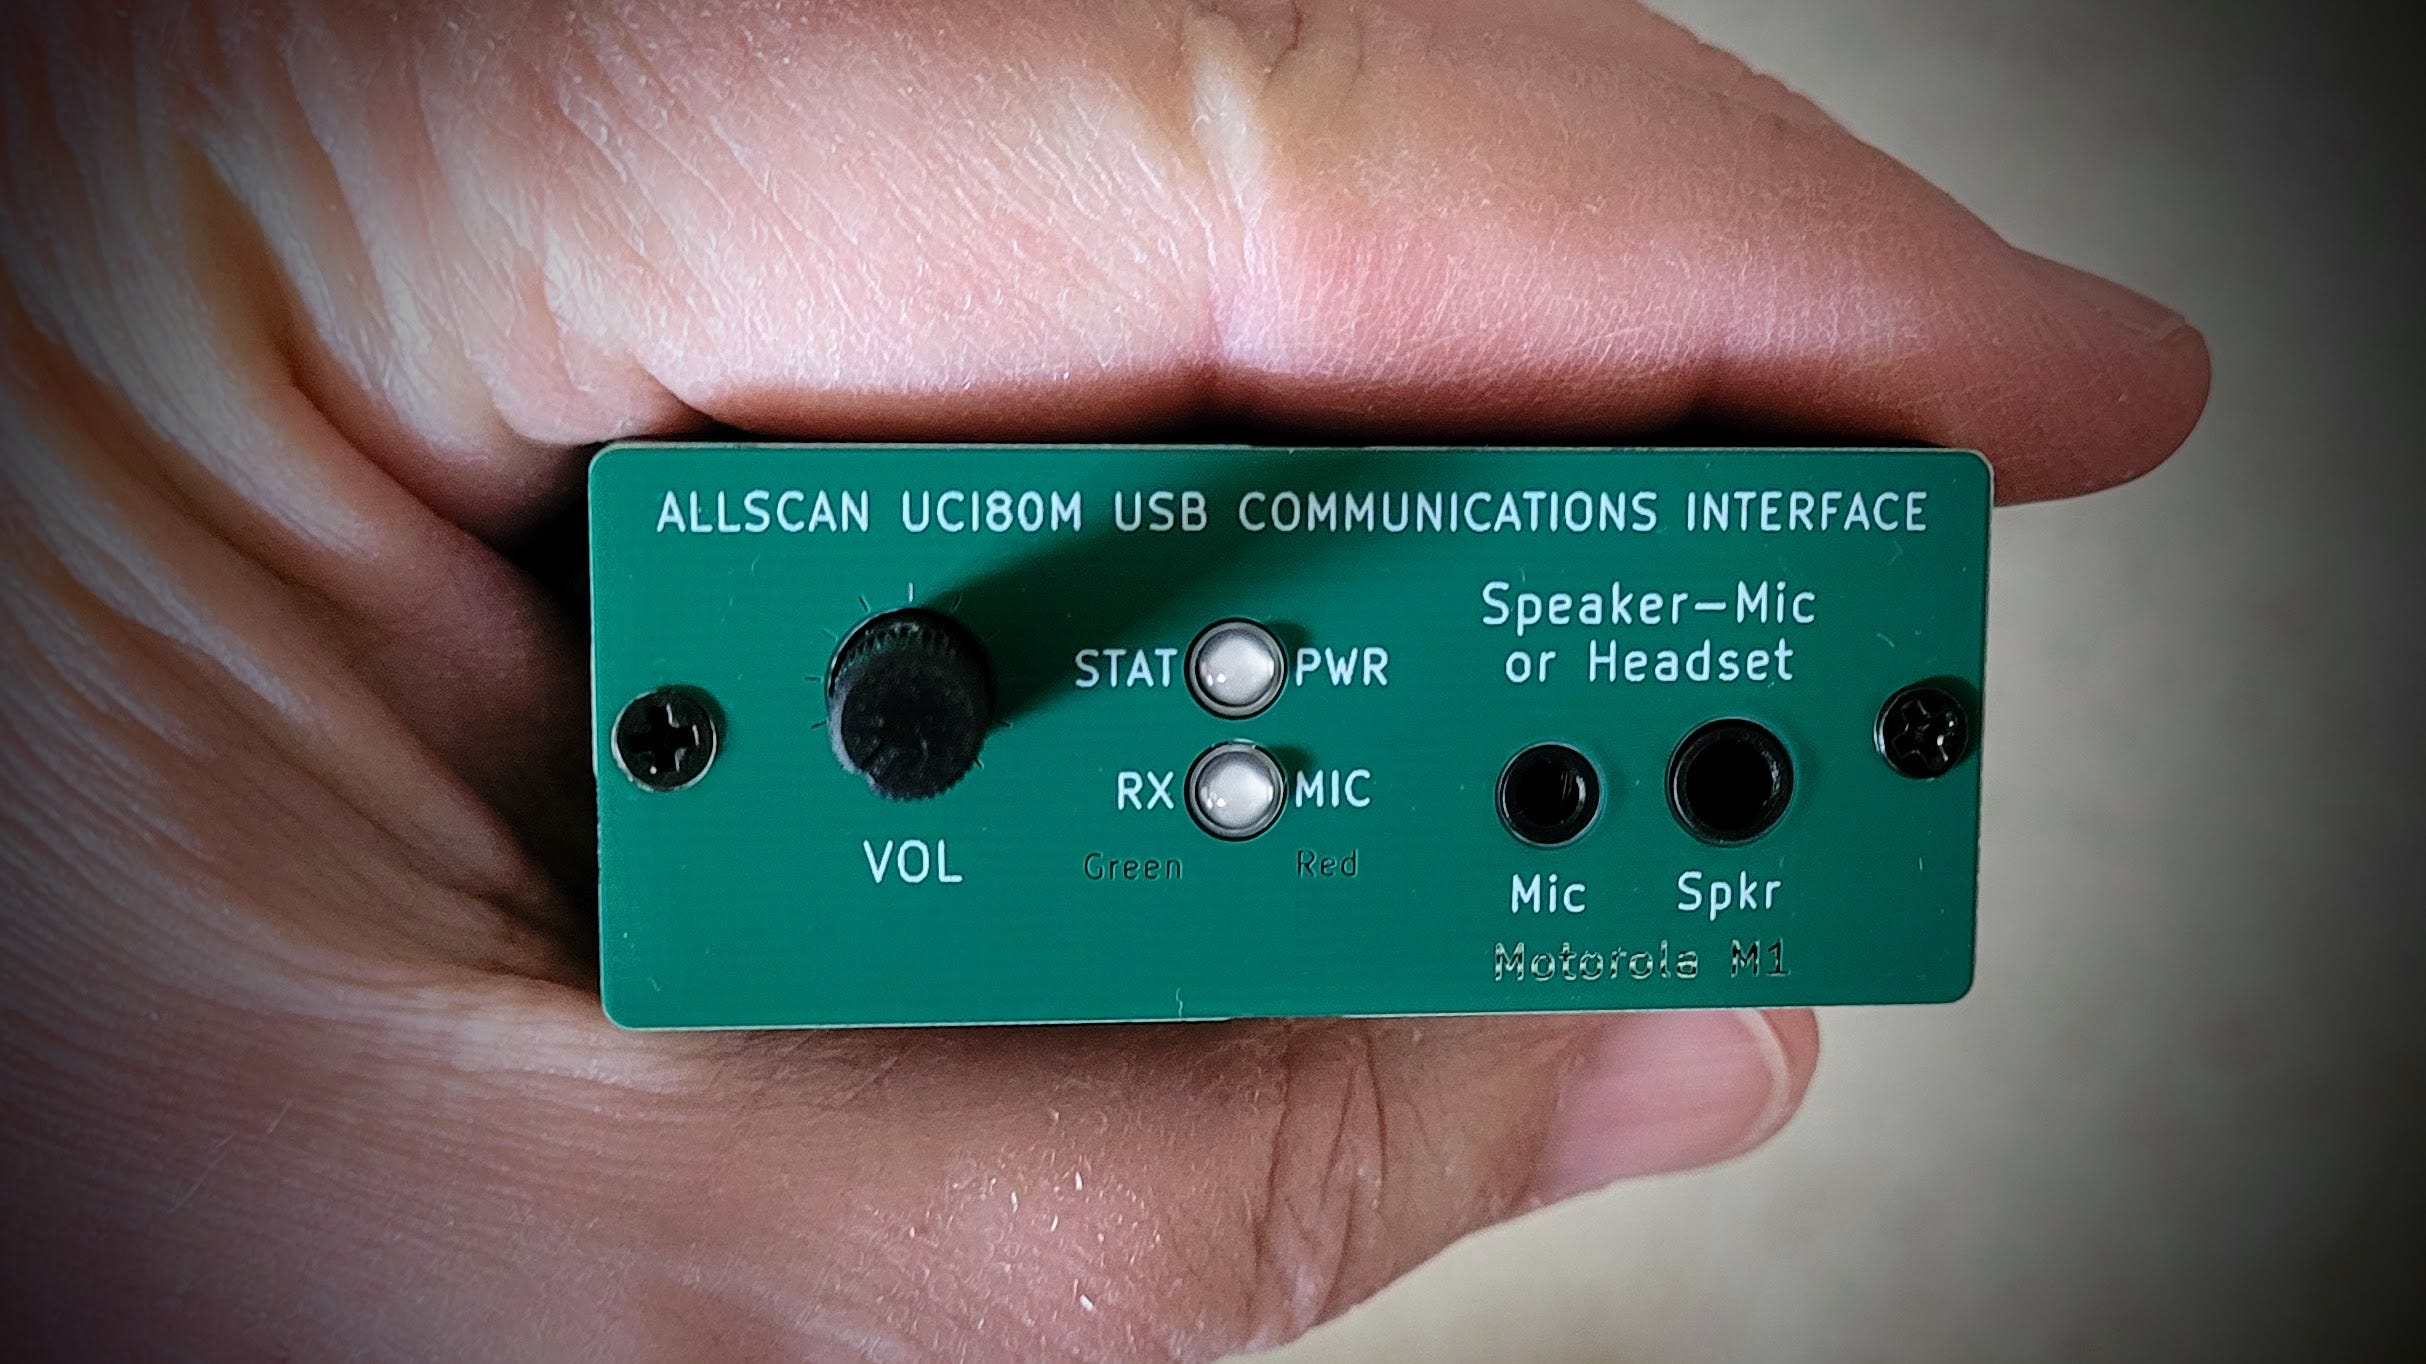
Tom Salzer KJ7TRandom Wire 180: AllScan UCI80M USB Communications Interface paired with a Raspberry Pi 4 and a Motorola speaker-microphoneRandom Wire℠
00 QRV
Welcome, radio friends. There is a strange bit of synchronicity as I write issue 180 —where I feature the AllScan UCI80M — and subscribers just went past the 2,180 mark. The number 80 seems powerful in my universe today!
Thank you to David WD5M
I’m once again monitoring the ISS over AllStar node 516221. I find it a bit addictive, probably because it was hearing live radio from space that sparked my interest in ham radio in the first place. Many thanks to David McAnally WD5M for providing this node. He does a lot, including:
-
Streaming the ARNewsLine® reports on AllStar node 516228. See https://newsline.rfnet.link/ for more.
-
Streaming the ARRL Audio News on AllStar node 516229. See
https://arrlnews.rfnet.link/ for more.
-
Providing the SPACE Mission Audio page and streaming services.
I use these services every week. Thank you, David.
This Week
Featured in this week’s issue of the Random Wire is the AllScan UCI80M USB Communications Interface from an end-user’s point of view. How does it sound? The UCI80M and Motorola speaker-mic package sounds good. You won’t be disappointed.
I spent enough time on the UCI80M piece that I ran out of time to follow-up on the TinySA and NanoVNA-H4. Those remain on the “to do” list for a future Random Wire issue.
New articles on EtherHam.com this week:

01 Featured: AllScan UCI80M AllStar Node
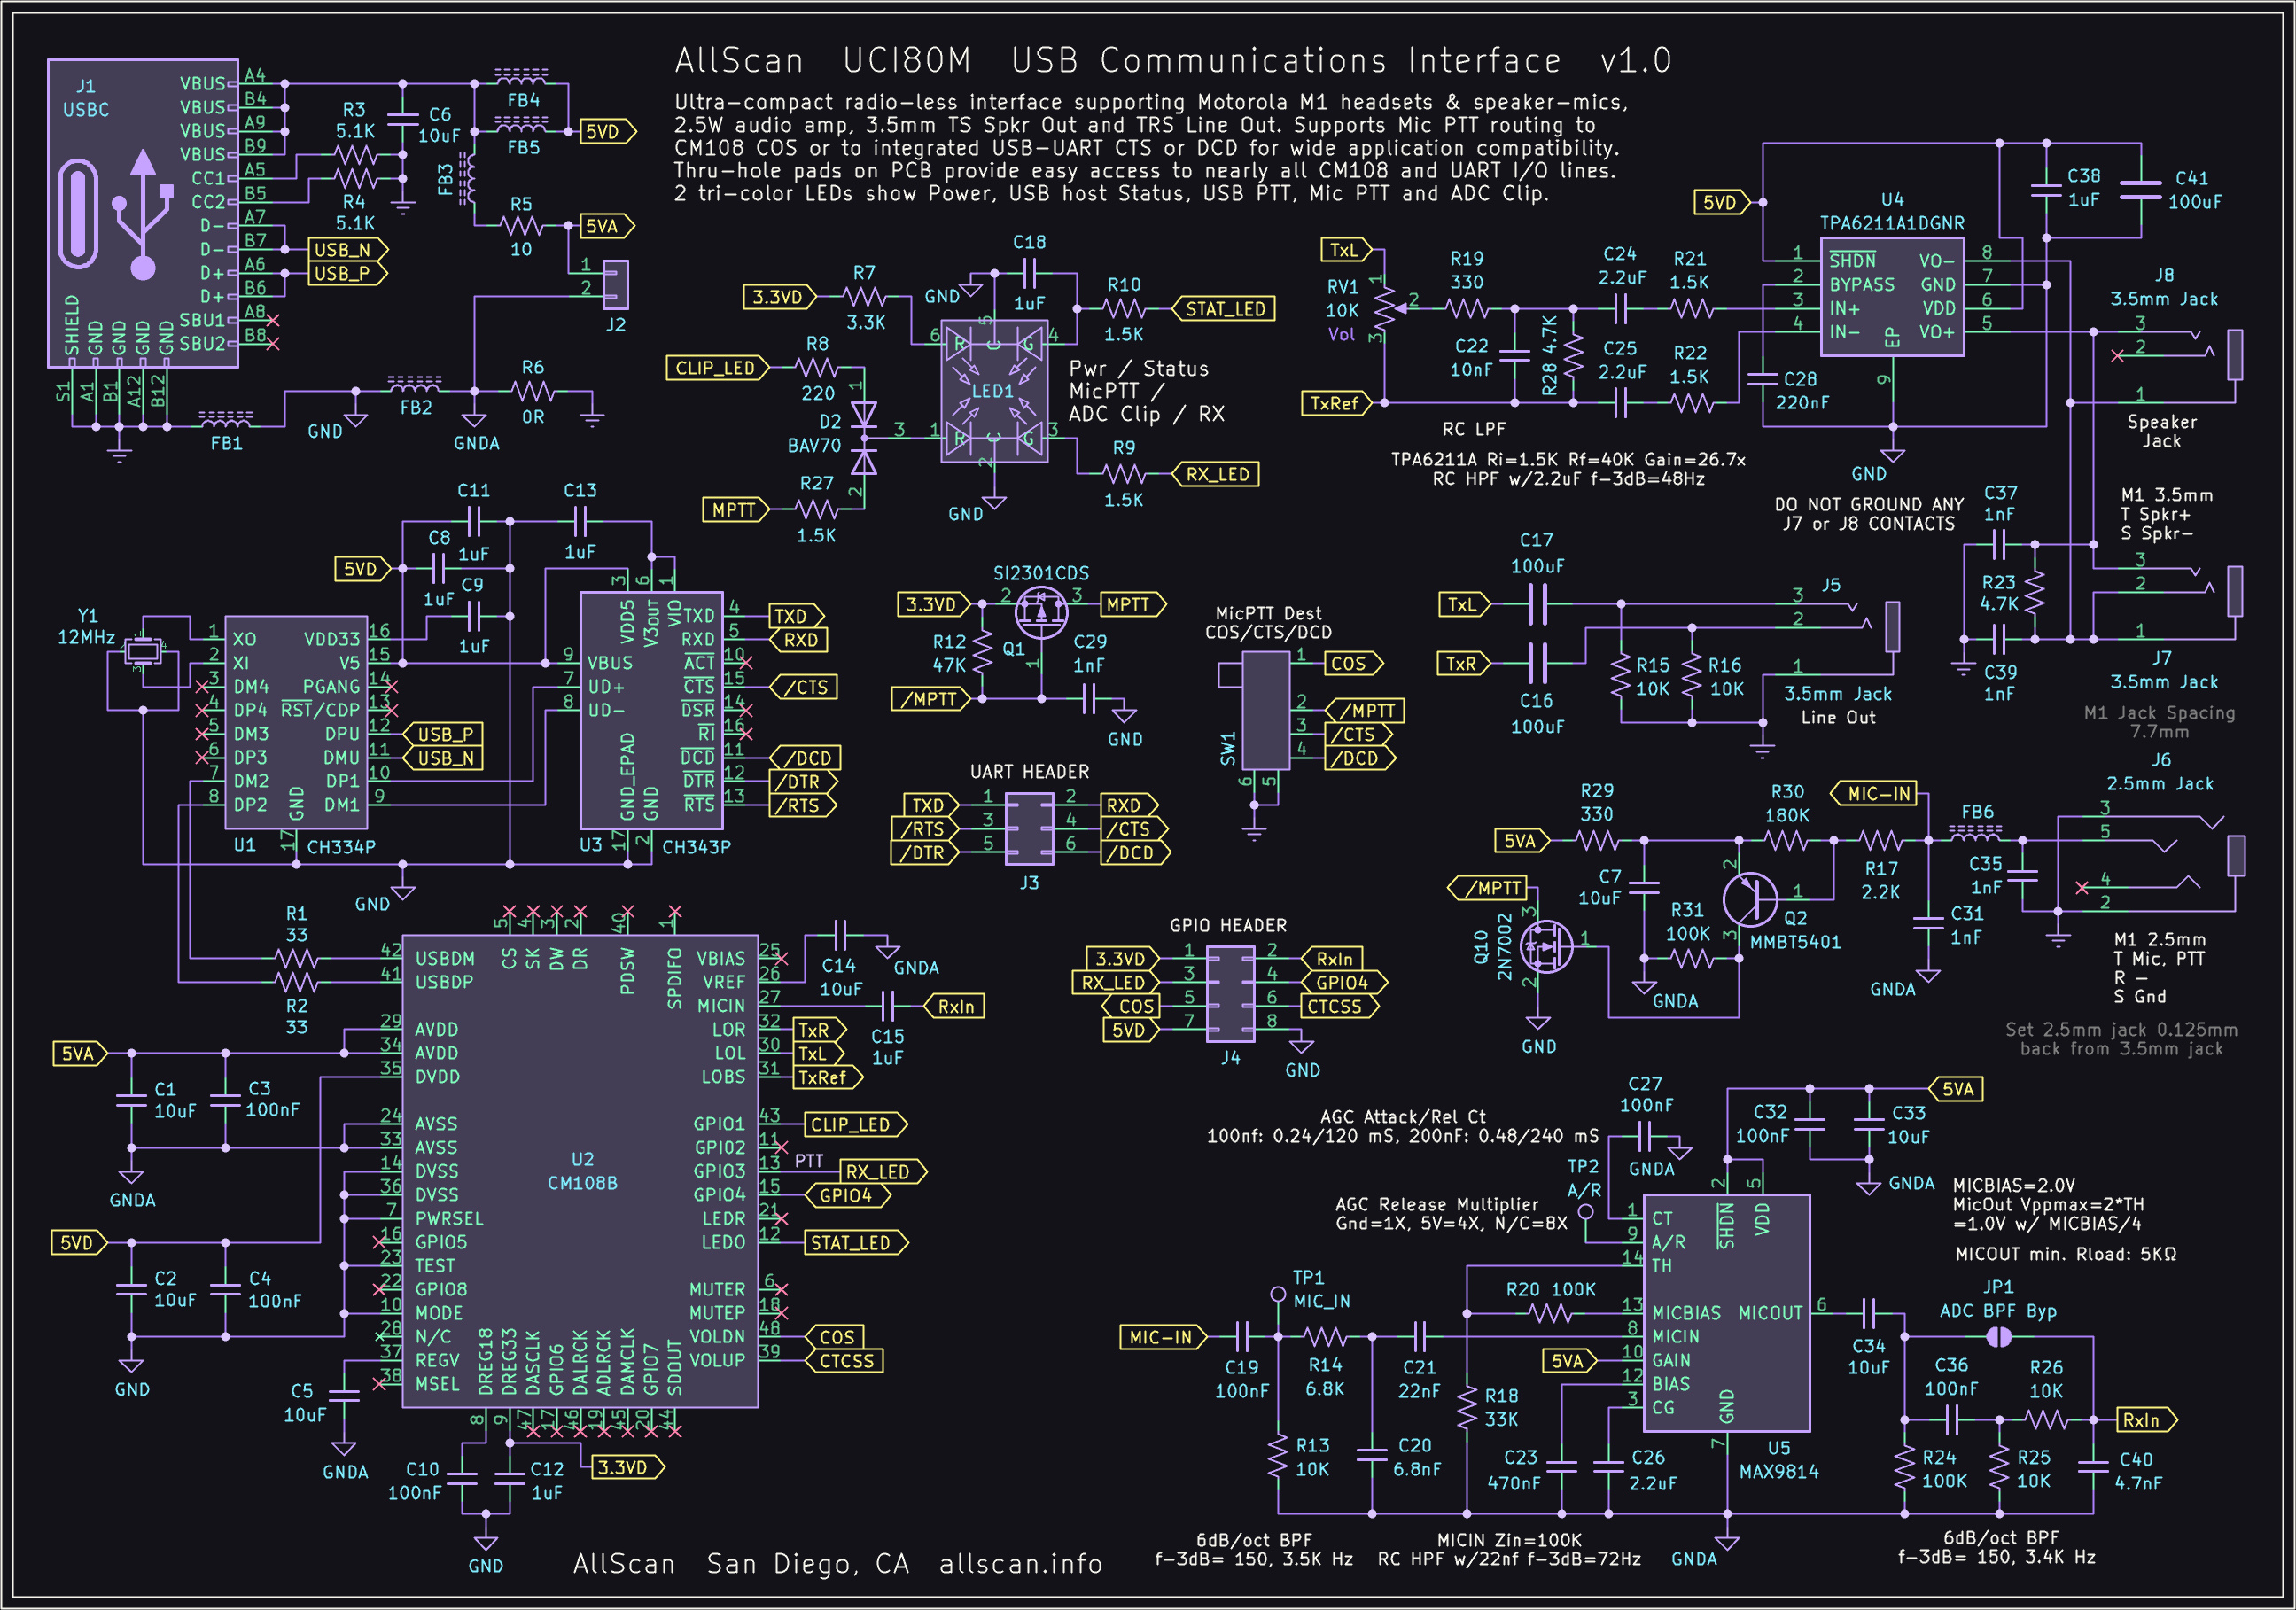
Recently, I purchased a new AllStar node device from AllScan.info. The units available from AllScan are designed by David Gleason NR9V. I am consistently impressed with the quality of his builds and how well they handle audio.

AllScan UCI80M device The UCI80M
I do love a small, capable device. As soon as I recognized the diminutive size of the UCI80M, I bought one. UCI stands for USB Communications Interface. The M stands for Motorola. The UCI80M is a small USB device that attaches to a computing device like a PC or Raspberry Pi, and uses a Motorola M-1 speaker-microphone for TX and RX audio.
David writes:
The UCI80M has the same features as the UCI80 but connects to Motorola M1 Speaker-Mics such as the PMMN4013A and PMMN4029A, which have several advantages over K1 speaker-mics: Genuine Motorola speaker-mics are easy to find at lower prices than similar quality K1 speaker-mics, and have outstanding audio quality, wind resistance, and durability; The PMMN4029A is waterproof, the PMMN4013A provides an extra 3.5mm audio jack; M1 connectors do not share a common ground between the speaker and mic, supporting bridge-configuration audio amps and up to 4x higher output volume and less distortion.
If you appreciate a beautiful schematic, the layout for the UCI80M is available on the AllScan.info website.
The audio? It’s good. Here’s a quick test to the Enhanced Parrot node 55553:
My UCI80M Stack
My AllStar node 588412 consists of a UCI80M USB Communications Interface, a Raspberry Pi 4 in an iUniker fanless case, and a TalentCell battery. These pieces are held together with some clear Alien Tape. The Motorola M-1 speaker-microphone rounds out the package.

My AllStar node 588412 stack The iUniker case
This simple, boxy case was sourced on Amazon for $10:
iUniker Aluminiun Pi 4 Case Passive Heatsink Cooler for Raspberry Pi 4 Model B 8GB/4GB/2GB (affiliate link)
I’ve tried many Pi cases and find that I gravitate toward box-like shapes because the other major pieces are usually similarly shaped. That makes it easier to stack them.
I’ll touch on cooling the Raspberry Pi 4 in a moment.
The TalentCell battery
Most people probably would not use the battery I selected. It is, after all, relatively large, compared to the compact UCI80M and the Raspberry Pi 4. But it has proven to be reliable and long lasting. I’d like it to be a bit smaller, but at the same time, I appreciate that I don’t need to worry about how long it will last.
The TalentCell model YB1206000-USB lithium-ion battery takes 12-volt direct current (VDC) input and outputs 5 VDC. I have found you have to be careful selecting which TalentCell battery you choose, because some produce 9 volts out, some output 12 volts, and one has only one port for both charging and output. (When there is only one port and it does double duty, you can’t charge the battery while using it to power the Pi.) The YB1206000-USB, with 6000 mAh of capacity, provides 5 VDC out, just right for powering the Pi. (An alternative battery choice is the TalentCell YB1208300-USB with 8300 mAh capacity, 12 VDC input, and 5 VDC output.)
The battery has enough capacity to operate the node all day (most of the time, the node draws very little while in receive mode). What do I like about it? It puts out 5 VDC, has plenty of capacity, and I can disconnect the DC charger without causing the Raspberry Pi 4 to shutdown or reboot.

TalentCell battery The position of the rocker switch on the TalentCell battery is important. Per the manual, position “I” turns the output power on, and it must be in this position during charging. Position “O” turns it off, which also serves to prevent battery drain during storage. I leave the battery turned on all the time.
Connecting the pieces
Connections between the battery (or other power source), the Raspberry Pi 4, and the UCI80M are simple: a cable to charge the battery, a cable to power the Pi, and a cable to power and move data through the UCI80M:
-
12 VDC comes from a charger through a barrel jack into the battery.
-
A USB-A to USB-C cable from the battery provides power to the Raspberry Pi 4.
-
A USB-A to USB-C cable with ferrite from the Pi to the UCI80M provides power and serves as the two-way data conduit.
-
Audio in and out is through the Motorola PMMN4013A speaker-microphone.

Rear ports on the UCI80M stack I can disconnect the DC charger and carry it to a different place in the house. Using the Motorola speaker-mic, the quality of my transmitted audio is very good. The received audio I hear through the speaker-mic sounds better to me than the Kenwood K-1 speaker-mics I’ve been using with other AllScan nodes.
The Motorola speaker-mic
The PMMN4013A speaker-mic has an IP54 rating, an audio jack and “Windporting technology,” a Motorola term:
Windporting eliminates the whining and howling sounds of wind blowing across your remote speaker microphone while preventing water from clogging the microphone, resulting in clearer transmissions.
The audio jack is behind a small cover on the speaker-mic and takes a 3.5mm plug, so you can enjoy private listening when needed. (Motorola calls it discreet listening: “This RSM [Remote Speaker Microphone] also features a 3.5 mm audio jack that allows you to connect a receive-only earpiece for discreet communication.”) Volume is controlled by the UCI80M, not on the speaker-mic.
At first glance, the Motorola M-1 connector resembles the Kenwood K-1 connector, but they are not interchangeable.
, K-1 connector (right)")
M-1 connector (left), K-1 connector (right) Compact and capable
For me, this little AllStar layer cake — UCI80M, Raspberry Pi 4, and TalentCell battery — is small enough to fit on a shelf.

AllStar node 588412 on the shelf I mentioned above I was going to talk about cooling the Raspberry Pi 4. The iUniker case has no fan and serves as a passive radiator for excess heat. Covering some of the top fins might, I thought, compromise cooling. But I’ve been monitoring it with an infrared heat gun, my fingers, and the command line, and it’s been fine. The UCI80M puts very little load on the system.
Measured load on RX is quite light. The btop report shown below was collected during long QSOs on node 47970, the W3QV repeater in Roxborough, PA.

Node 588412 listening to node 47940 Here’s the btop report (click here to learn more about btop):

btop report while listening to node 47970 Bandwidth of the connection is shown in the lower left box. Memory consumption/availability is the box above that, and disk space is the other box in the lower left. Processes are shown in the lower right box. CPU usage is shown in the long, horizontal box at the top of the btop screen.
Power Consumption
In thinking about what I wrote earlier — “The battery has enough capacity to operate the node all day” — I realized that general statement was not particularly helpful. I needed to measure power draw.
What follows in this section is, ultimately, a faulty set of conclusions. I’m including all of my reasoning here so you can see how focusing on the numbers can result in ignoring something like usable capacity of the year-old battery. On with the measurements and calculations.
To measure power draw, I used a Klein Tool ET920 USB Digital Meter to measure the voltage being supplied to the UCI80M and the current. Unfortunately, the ET920 does not pass data, so I was unable to assess power consumption while transmitting. (And in thinking about it, I wasn’t measuring draw during RX, either. More on that in a moment.) However, at idle, I measured just 60 milliamps being consumed by the UCI80M.

Klein Tools ET920 (A couple of notes about the Klein Tools ET920. This device is quite small. It does not function as a cross-over unit, meaning you have to match the input and output USB style, i.e., USB-A input goes only to USB-A output. It also does not pass data. I found that the packaging requires very careful deconstruction to get the instructions out undamaged. Translation: I damaged the instructions. I’ll be sure to give that feedback to Klein Tools!)
Klein Tools ET920 USB Power Meter, USB-A and USB-C Digital Meter for Voltage, Current, Capacity, Energy and Resistance (affiliate link)
With a 6000 mAh battery and 60 milliamps of current draw, and assuming about 80% useful capacity of the battery before performance falls off, that’s about 80 hours of continuous receive performance available. Battery life will be reduced with transmissions, but I doubt consumption is more than about 1 amp. Since most node usage is RX, this stack should have at least two to three days of continuous working time.
But here’s where my reasoning went awry. Since the Klein ET920 doesn’t pass data, that means I was not measuring power draw during receive. All I was measuring was the idle power draw of the UCI80M — not its consumption during actual receive operation. I reached out to the maker, David Gleason, who said:
The power consumption during Rx i.e. when the audio amp is driving a speaker will vary greatly depending on the volume setting and speaker impedance. The audio amp can output 2.5W and thus a UCI could theoretically use as much as about 600mA, but audio signals typically have short peaks and relatively low average power and at normal home listening levels the UCI shouldn’t draw much more than 100mA. Even at very high volumes it should not average any more than 300mA with a 3Ω load, or with speaker-mics which are more like a 16 or 32 Ω total average power consumption even at max volume should be well under 1W (5V x 200mA).
Therefore, since I’m using a speaker-mic, my power consumption during operation will likely be between 60 mA (idle) and 200 mA (max volume). If I assume 200 mA draw and 80% capacity of the battery, the stack should last for a day.
As a test of this assumption, I unplugged the charger at 0800 Pacific on April 28th. It stopped registering on AllStarLink.org at 2026-04-29 12:03 UTC, which converts to 0503 Pacific April 29th. Real-world performance: about 21 hours of continuous service.
While the power draw is still relatively low, real-world performance did not exactly match my expectation. That, of course, is why one does a real-world test: to make sure assumptions and calculations are valid. In this case, they are not.
What are the variables? Power draw was estimated, so it could be off. Usable battery capacity was also a guess since this battery has been in continuous service for a year. I suspect the battery has lost significant capacity over the past year of use.
The lesson: measure under real conditions, not assumptions.
Raspberry Pi 4 Temperatures
I was also curious about the Raspberry Pi 4 CPU temperature. I found that vcgencmd is included with the Debian 13 operating system, so I used it to look at the CPU and PMIC temperatures. (The Raspberry Pi 4 and 5 use dedicated Power Management Integrated Circuits — PMICs — to manage voltage regulation, sequencing, and monitoring.)
In the screenshot below, you can see that the ARM CPU is running at 40.4°C and the PMIC is at 37.4°C.

vcgencmd outputs The instantaneous frequency measurement shows the ARM CPU is running just above idle at 700 MHz instead of running at its maximum frequency of 1.8 GHz. The vcgencmd command is worth having in your set of tools for working with Raspberry Pi 4 and 5 computers.
But How Does It Sound?
The UCI80M and Motorola speaker-mic package sounds good.
Here’s a side-by-side comparison of two of my nodes. The one on the left is running Ampersand-ASL on a Dell Wyse 3040 mini PC, through an AllScan UCI90 USB Communications Interface, with a genuine Kenwood K-1 speaker-microphone.
The node on the right is running AllStarLink 3 on a Raspberry Pi 4, through an AllScan UCI80M USB Communications Interface, with a genuine Motorola M-1 speaker-mic.
Please excuse the shaky video: I was holding the smartphone in my hand and simultaneously trying to adjust the volume knobs and keep things framed and focused. (Note to self: next time, use the tripod!)
Bottom line: both platforms provide clean, crisp, clear audio. To my ears, the Motorola sounds slightly better. But this is very much a matter of taste, because both work and sound great. I have no hesitation about using either of them at any time. One sits beside my standing desk in the corner of the living room. The other sits on the supply table next to my wife’s hospital bed in the sun room.
I monitor both quite often. I think you’ll be pleased with them, no matter which one you choose. Find out more at https://allscan.info/products/.
02 HamDash Is Improving
The HamDash app — available at https://hamdash.com — has been improving steadily, week by week. It’s now a regular stop when I’m thinking about getting on the air and while I’m operating on HF.
One of the nice additions is the ability to change the text size. In the screenshot below, I’ve set the font to “large,” making it easier for my eyes to read without reaching for my reading glasses.

HamDash: latest If you look at the menu choices to the right of the blue-ish Dashboard button, you’ll get a good idea of the range of content available.
03 Ollama LLM on Proxmox LXC
I’ve been playing with Ollama — a large language model engine — on the Raspberry Pi 5. With 16 GB of RAM, the RPi 5 is the most capable Pi in my lab.
And then I wondered: can I install Ollama into an LXC on my Proxmox machine? That platform has an i7 CPU and 64 GB of RAM, so it should have enough horsepower to do better than the Pi.
I found an Ollama machine installation script at https://community-scripts.org/ and installed it. Then I asked Claude about installing Open WebUI for a chat interface with Ollama. We got that done by installing Open WebUI into the same LXC that Ollama was running in. The Open WebUI screen is rather plain, but I am looking for functionality, not decoration.

Open WebUI interface Then I installed and tried several different LLMs. I looked at the llama3.1:8b model — very capable, given the limitations of my hardware. I tried phi3, a smaller model, which was quick but tended to hallucinate (it kept answering as if I was reading a science fiction novel). I ran mistral which seemed too slow; I ended up removing it. And I tested gemma3:4b.
In the Ollama + Open WebUI Setup on Proxmox article on EtherHam, I summarize the three models I kept on the machine.
gemma3:4b — Recommended for Conversational and Factual Tasks
gemma3:4b is the recommended default for focused, shorter interactions:
-
Best factual accuracy: Gemma 3 was specifically tuned by Google to reduce hallucination.
-
Self-aware responses: Reliably acknowledges the limits of its knowledge rather than fabricating answers.
-
Good reasoning quality: Responses are well-structured and thorough compared to same-size alternatives.
-
Limitation — context window: Default context window is 4096 tokens. Prompts containing large blocks of pasted text may cause the model to stall or time out. Use llama3.1:8b for document-length tasks.
llama3.1:8b — Recommended for Document-Length Tasks
llama3.1:8b is the better choice when working with longer content:
-
Larger context window: 8192 tokens by default, making it suitable for proofreading articles, summarizing documents, and reviewing longer technical content.
-
General purpose: Solid quality across coding, writing, and analysis tasks.
-
More verbose: Tends to produce longer responses than gemma3:4b, which may or may not be desirable depending on the task.
-
Slower: At 4.9 GB on CPU-only inference, response times are longer than gemma3:4b or phi3.
phi3:latest — Recommended for Speed-Critical Tasks
phi3 is the fastest model in the stable and is useful when response time matters more than depth:
-
Fastest response: Smallest footprint at ~2.2 GB; optimized by Microsoft for edge deployment.
-
Good for quick lookups: Short factual questions, quick code snippets, or rapid brainstorming.
-
Lower quality ceiling: Less thorough than gemma3:4b or llama3.1:8b on complex or nuanced prompts.
You can dive much deeper into the installation, configuration, and management of these models in Ollama + Open WebUI Setup on Proxmox.
04 APRS on the ISS
I caught myself thinking: I should dig out my handheld VHF/UHF yagi antenna and try to work the ISS over APRS! I started researching…and found out I can’t. The last APRS contact was with KC5ILO-10 on 2026-04-23 at 21:53:46 UTC.
The posted status message: “Please note we’re still in the process of troubleshooting and testing this radio.”
If you’ve been trying to make contact with the ISS using APRS, please be aware the Kenwood D710GA transceiver is not working correctly. Hopefully, the crew will get this sorted soon.
Resources
05 The Ongoing Saga of WiRES-X
I wish I could report that the upgrade to WiRES-X 2.0 was a positive change for everyone, but I can’t. Evidence? America’s Kansas City Wide network is not upgrading to WiRES-X 2.0 at this time because of compatibility issues:

Screen capture from KCWide home page
06 AllStar Without Asterisk
This is a very interesting project. I’m currently running two implementations: Ampersand-ASL Server on a Dell Wyse 3040 with an AllScan USB interface, and Ampersand-ASL Server on my Windows laptop. (I mentioned Ampersand-ASL above at the end of the Featured: AllScan UCI80M AllStar Node piece.)
Ampersand ASL is the brainchild of Bruce MacKinnon KC1FSZ. (If you visit his QRZ page, just keep scrolling. It is chock full of interesting projects!) When I heard about it, I reached out to find out how I could help test it. The idea of AllStar without Asterisk was a bit mind-blowing, and I admit I was skeptical. But it works well.
One of the unique aspects of this project is how compact the total system size is. Without Asterisk, it makes the software footprint quite small.
On the project’s GitHub page, you can see activity in several different Amp-ASL approaches. My two implementations are amp-server and amp-win. Bruce’s work has tailed off a bit recently, and my guess is he got temporarily pulled away from Amp-ASL development.

Screen capture from Ampersand-ASL project page amp-win
On my Windows computer, amp-win starts as Ampersand.exe which opens a terminal window:

amp-win startup on Windows Once the system has loaded (just a few seconds), I open a browser to 127.0.0.1:8080 to see the Amp-ASL Server. In the captured video below, I connect to the Amp-ASL Parrot, then make two test transmissions:
For this test, I used Soundbrenner Wave in-ear audio monitors with an accessory boom microphone. (There is also an audio sample available for Ampersand-ASL Server running on a Dell Wyse 3040, found near the bottom of the featured article above about the AllScan UCI80M.)
I find this Windows implementation of ASL very convenient when I’m traveling. With a pair of Bluetooth headphones, I can listen to QSOs directly over my computer. I do find that my transmitted audio with BT phones is often very low. Hard-wired phones with a boom mic close to my mouth seem to work the best.
These are still early days for this software, so there are a few rough edges. For example, if you disconnect your earbuds or headphones while Amp-ASL is running, it often crashes the program. The workaround: make sure your buds or phones are the ones you want to use, then start Ampersand.exe, then open your browser. Good to go.
Want to try this? Directions are available at Ampersand Windows Server User/Install Documentation. Bruce writes:
To avoid any confusion: this program provides a full ASL node that is capable of placing outgoing calls and receiving incoming calls. You do not need to have a second Linux server. This is experimental work that explores the potential of ASL linking without the use of the Asterisk PBX system. Project documentation is here.
amp-asl on 3040
I’m also running Amp-ASL on a Dell Wyse 3040 mini PC, with audio piped through an AllScan UCI90 USB Communications Interface and a K-1 speaker-microphone. I manage node connections with the AllScan favorites management app running on the 3040 and accessed through my browser. Works great.
For this implementation, I start with the directions at amp-server and then jumped to the install documentation linked above.
amp-hub
Interestingly, there is also an Ampersand Hub implementation aimed at headless servers like in a server farm or cloud hosting service. Details are available on the amp-hub page.
Will It Run on Other Raspberry Pi Platforms?
One of Bruce’s test platforms has been a Raspberry Pi 5. I wonder if his Amp-ASL system would run on the diminutive Raspberry Pi Zero 2 W? Architecturally, the Pi 5 CPU is similar to that used in the Zero 2 W. The main differences are in clock speed and amount of RAM available.
This might be an interesting experiment. I worked through some details with ChatGPT and the speed difference makes a Pi Zero 2 W unworkable for a hub node (where hub means many nodes connected simultaneously). It might work okay for a single node connection, but it’s probably best to consider this experimental. With the Pi 5, downsampling takes about ~25 µs (microseconds); with the Pi Zero 2 W, the same downsampling would take about ~100–200 µs, primarily because of the slower clock speed. It might work. Might.
I asked ChatGPT to postulate how Amp-ASL might run on different Raspberry Pi computers:
The Raspberry Pi Zero 2 W can run Ampersand-ASL, but it operates much closer to the edge of what the software requires. Its quad-core Cortex-A53 at 1 GHz is capable of handling the basic real-time audio pipeline—packet handling, filtering, and playback—but with far less headroom than the Cortex-A76 cores in the Raspberry Pi 5. In practice, that means a Zero 2 W is best suited for a very small, lightly loaded node: a single connection or perhaps a couple of users, modest audio rates, and minimal additional features. It should be viewed as an embedded endpoint or experimental platform rather than a general-purpose hub.
Stepping up the ladder, the Raspberry Pi 3 Model B+ sits in a similar architectural class (also Cortex-A53), but with a higher clock speed and better I/O, giving it a bit more breathing room than the Zero 2 W—enough for a small, practical node with a handful of connections if you’re careful. The Raspberry Pi 4 Model B is a much more capable middle ground, thanks to its Cortex-A72 cores and higher clock speeds; it can comfortably handle multiple streams and typical node duties without constantly riding the real-time limits. At the top end, the Raspberry Pi 5 provides ample headroom for Ampersand-ASL’s DSP workload, making it the best fit for production use, higher connection counts, and future expansion. In short: Zero 2 W for minimal endpoints, Pi 3+ for modest nodes, Pi 4 for solid everyday use, and Pi 5 for anything you don’t want to think twice about.
Those two paragraphs are AI-assisted, so consider them informed estimates rather than definitive guidance.
07 The Short Stack
Radio
-
Power Cord Green Goo – Plasticizer Migration In Vintage Electronics — “The phenomenon of “green goo” or “green slime” oozing from the power cords of vintage electronics is a well-documented nuisance in the world of retro-audio and antique radio restoration.”
-
The TIDRADIO TD-H9 in Black: A Deep Dive into the Most Feature-Packed Handheld Radio Under $70 — “So when TIDRADIO released the TD-H9, I was skeptical. Could a sub $70 radio really deliver GPS, APRS, Bluetooth programming, a spectrum analyzer, and 10 watts of output power? After several weeks of real-world testing from urban environments to remote backcountry trails. I can confidently say: yes, it can.” I ordered the one at this affiliate link: https://amzn.to/4deltky.
-
zBitx v2: The 5 watts, all bands, all mode SDR in your pocket for $269 — I had not realized the zBitx now had a version 2 edition until I read the Zero Retries newsletter.
-
Building A Ham Radio Data Transceiver On The Cheap — While not new (from last October), this is still interesting. It uses an All-In-One-Cable (AIOC) and DigiPi software.
-
Ham Radio in the Internet Age (2024) — “Some old hams say the Internet is ruining ham radio. I say it is changing ham radio just like it has changed virtually everything else. Some of those changes aren’t that drastic anyway.”
Computing / AI
-
Your Chrome new tab page is a vibe coding project waiting to happen — I’m going to have to try this.
-
The Best Laptops for Older Adults — These devices are probably good candidates for amateur radio operators, not because they are older adults, but because the laptops feature ease of use, visual clarity, and reliability.
-
You don’t need a Raspberry Pi for most “Pi projects”—here’s what you can use instead — As previously noted in many places, prices for Raspberry Pi single-board computers (SBCs) are climbing, making the jump to a more capable mini PC a more reasonable proposition.
-
Picking your first local LLM is easier than the internet makes it sound — “Choosing your first model is the part that trips everyone up. But once you understand what you’re looking at, it becomes really easy.”
-
What is a Large Language Model (LLM) — “Large Language Models (LLMs) are advanced AI systems built on deep neural networks designed to process, understand and generate human-like text.”
Starlink
-
Starlink. Ho-hum. — “I made a phone call from one hand to the other, through a network of satellites moving overhead at 17,000 miles per hour. It worked exactly as expected. No drama, no delay, no sense of wonder. Just another day in the life.”
Antennas
-
Stealth Ham Radio Antennas that Actually Work — “That’s the topic of this week’s video: Ham Radio in an HOA? Here’s What Works!”
08 📋Digital Radio News Digest
Executive Summary
Recent developments in amateur radio digital voice and VoIP linking modes include updates to MMDVM firmware for DMR trunking, fixes for WiRES-X 2.0 issues, and improvements to AllStarLink and EchoLink clients. The M17 mode has seen several commits to the OpenRTX firmware, including fixes for QR code generation and SKY72310 driver updates. AllStarLink is looking for beta testers for their new client, and several issues have been resolved on their forum.
Per-Mode Breakdown
DMR
The MMDVM firmware has seen updates, including small cleanups of the DMR trunking code and a merge of pull request #358 from qradiolink/trunking_patches. A Reddit user is looking for DMR devices that can do a PAN connection over Bluetooth.
D-STAR
A commit to the Pi-Star dashboard fixed an issue with empty /etc/dstar-radio.* files on first-time setup. A Reddit user shared a multi-platform DStar reflector client.
YSF/C4FM/WiRES-X
HamOperator reported problems with WiRES-X 2.0, but no other updates are available.
M17
Several commits have been made to the OpenRTX firmware, including fixes for QR code generation, SKY72310 driver updates, and improvements to the lib/qrcode module. The M17 Gateway (Go) has seen a fix for SX1255 ALSA auto-detection on Pi 3/4 with onboard audio enabled.
VoIP Linking
AllStarLink is looking for beta testers for their new client, and several issues have been resolved on their forum, including problems with connecting to new nodes, weird noise issues, and DTMF problems. The app_rpt and amp-server repositories have seen several commits, including updates to the rpt_serial and chan_usrp modules. Amateur Wire has announced experimentation with new features.
Notable Firmware or Software Updates
-
MMDVM firmware: updated DMR trunking code
-
OpenRTX firmware: fixes for QR code generation, SKY72310 driver updates, and improvements to the lib/qrcode module
-
AllStarLink: updated app_rpt and amp-server repositories
-
Pi-Star dashboard: fixed issue with empty /etc/dstar-radio.* files on first-time setup
Cross-Mode Developments
No significant cross-mode developments have been reported.
-
Content generated: 2026-04-30 15:55 UTC — 59 items collected
-
Download the list of 59 items at https://etherham.com/download/179599838/?tmstv=1777564893
-
To reduce the collection of stale news, I updated the Data Radio News Gatherer script by incorporating a date filter on RSS feeds
09 📡Band Conditions This Week
-
Solar Flux Index (SFI): 102.0 — Moderate — reliable HF propagation
-
K-Index (current): 1.0 — Quiet — excellent conditions
-
K-Index (7-day max): 3.7 — Active — some HF degradation
-
A-Index: 7 — Quiet (predicted)
-
Sunspot Number: 85
-
Active Solar Regions: 10
With a Solar Flux Index of 102 and a quiet K-index of 1, the HF bands are in good shape right now — 20, 17, and 15 meters should be offering solid DX opportunities, and 10 meters is worth a listen given the moderate solar flux and ten active regions on the sun’s face. That said, the week wasn’t entirely smooth; a 7-day max K-index of 3.7 tells us there were some unsettled stretches that likely rattled the higher bands and pushed auroral noise into the picture for a bit. If conditions were frustrating a few days ago, take heart — today looks like a fine time to get back on the air and work some DX.
-
Source: NOAA Space Weather Prediction Center (swpc.noaa.gov)
-
Generated: 2026-04-30 16:05 UTC
10 📻This Week in Radio History
Notable events from approximately April 27 through May 1, across the years.
1900 — Marconi Files the Patent That Made Tuning Possible — On April 26, 1900, Guglielmo Marconi filed his landmark British Patent No. 7,777 — known ever after as the “Four Sevens” — covering a system of tuned coupled circuits that allowed a wireless receiver to be locked onto a specific frequency. Before it, early wireless stations flooded each other with interference. After it, stations could share the spectrum without stepping on one another. Every receiver you’ve ever tuned — HF rig, repeater, handheld — traces a direct line back to the principle Marconi documented on this date.
2001 — A Civilian Heads to Orbit — On April 28, 2001, Dennis Tito launched aboard Soyuz TM-32, becoming the first private individual to travel to the International Space Station. Spaceflight depends on robust RF communication at every stage — and for amateur radio operators, the ISS would soon become a familiar voice overhead.
From the spectrum-taming patents of 1900 to the satellites overhead today, these milestones still echo in the bands we use every day.
11 QRT
Saturday’s M17 Net
Radio in my pocket
I enjoyed Saturday morning’s M17 net. This is carried every Saturday at noon Central time on America’s Kansas City Wide network. I could have participated with a Yaesu HT and hotspot, or by connecting with DroidStar, or with BlueDV and an AMBE stick. But I connected with a CS7000-M17 PLUS HT through my M17 hotspot to the M17-KCW reflector over Module A, using an accessory speaker-mic to listen in. Clipping the speaker-mic near my ear means I can easily hear transmissions clearly without disturbing my spouse. The radio in my pocket makes this highly portable. (I washed dishes during the net.)
")
Tom Salzer KJ7T with CS7000-M17 PLUS HT (and AllScan ANF101 in background) It also leaves my hands free so I can continue to work on this newsletter while listening to the net. Jeff AE5ME does a great job with the net. I always find it informative and interesting.
Raw Notes From Saturday’s M17 Net
-
LinHT rev B booted up. SX1255 chipset. Fully functional Linux computer running. Can run GNU radio package. DMR through GNU radio, for example. Main M17 Foundation project.
-
Friday, October 16, ZRDC. M17 will be presented by AE5ME, sounds like.
-
Install GNU radio on desktop or laptop, tie to SDR, way to create your own M17 station. Use SX1255 plus amplifier. This is a roll-your-own desktop station.
Sunday Logging Oops
Sunday morning, I cranked up an FT8 session on 20 meters and began making contacts. But when I glanced at my QRZ log, I didn’t see the contacts added to the log.
Scratching my head, I finally realized I had forgotten to start GridTracker. This is important because WSJT-X does not talk directly to QRZ. Instead, GridTracker acts as a bridge between WSJT-X and the QRZ log system.
Would those missing contacts be added once I started GridTracker? No. However, the contacts were logged in an .adi file by WSJT-X, and there is an easy way to bring the contacts into QRZ:
-
Locate the .adi file. Find the WSJT-X log file — usually named wsjtx_log.adi, in C:UsersYourNameAppDataLocalWSJT-X.
-
Log into QRZ.com, open your QRZ log, go to your logbook settings, and use the “Import ADIF” routine to upload your wsjtx_log.adi file.
Does it work? Yep. Doing this added the three missing contacts to QRZ, catching up my log.
#################
# Import Results
#################

3 QSOs were inserted
150 duplicates were replaced
190 duplicates ignored
0 errors.
3 queued for confirmation checking
Wishing KW6U a Great PCT Journey
I was monitoring AllStar node 51018 to hear the W6EK Coffee Break Net on Sunday when I learned that Jeff KW6U is launching a border-to-border hiking adventure on the Pacific Crest Trail. Jeff has been one of the net control stations for the Coffee Break Net.
I have very fond memories of hiking in my teens and early 20s throughout the Washington Cascades and Olympics. I’ve been up (and down!) every major drainage in the Olympics, most of the time on solo hikes. Unfortunately, my knees won’t take this kind of activity now. I’ll be following Jeff’s journey from afar and sending him good wishes. Hopefully, he’ll check into some repeaters while he makes his five-month-long journey.
My Other Writing Project
I used some of my writing time this week on another writing project.I’m trying to keep up regular progress on this. The easiest thing would be to set it aside and think to myself: I need to ponder this a bit more. Instead, I’m trying to just write and then come back to it later for editing. So far, that’s working.
73, and remember to touch a radio every day!
-
-

Fediverse Meet-up at Hamvention 2026
Members of the Fediverse are invited to join fellow users at Hamvention 2026. An informal meet-up will take place Saturday, May 16th at 11:00 AM. We’ll meet in front of booth 1506 in Building 1, aka the Maxim building.
(Booth 1506 is home to Zero Retries and DLARC. Thanks to Steve and Kay for allowing the use of their booth as a rendezvous point!)
This author will be at the meet-up with stickers. Hope to see you there!
What is the Fediverse and how does it relate to ham radio? The Fediverse is a collection of social networking sites that communicate with one another in a decentralized way. It’s an open source alternative to centralized social networks such as Facebook and X. There are several ham radio themed Fediverse instances with thriving communities of radio amateurs:
You can find this author on the Fediverse at https://mastodon.radio/@K4HCK.
Source: Amateur Radio Daily
-
S9R – Sao Tome & Principe
[UPDATE] – Full details now available here – PDF file – download safe – credit EC7R. [MARCH 12] – Francisco, CT7AKS recently added S9R to the QRZ.com database. This is going to be a DXpedition to Sao Tome & Principe scheduled for October 17-31, 2026. Full details to follow in due course.
-
JI3DST/6 & JA4GXS/6 – Danjo Islands, AS-056
[INFO] by Ken, JA4GXS & Take, JI3DST. The Danjo Islands are uninhabited islands with no regular ferry service (approximately 4 hours by boat from mainland Kyushu). JI3DST/Take and I will be going to these islands with the following plan in order to communicate with as many IOTA chasers as possible. The IOTA credit rate is […]
-
How Do You Become a Good Ham Radio Operator? Listening is a Great Start.
For many years, I was an instructor for fire, EMS and law enforcement academies. More often than not, sessions would start out something like this: “Today I am going to teach you what you need to know to pass the test. Later, when you have passed the test, we will discuss how things really work.”
Whether it is public safety, parenting or anything in between, there is the “book” way and the “real-world” way. Life doesn’t always follow the book or the rules. Our job is to figure out how to be the most effective communicator while adhering to the spirit of our hobby and not violating any rules or regulations.
So where do you learn how it really works? Here are a few sources of real-world wisdom to learn from. Remember, you need to take your exposure in each of these areas, measure it against “the book,” and take the best of everything to make it your own. Also keep in mind that every time you go key down, you are an advocate for the hobby.
First You Should Listen
I tell everyone to begin listening to the local repeaters as soon as you can, even before getting your license. This will give you a taste of how things flow on the repeaters in your area. There are commonalities across the hobby, but there may be some local flavor that occurs where you live. By listening early, you will be more confident to make that first repeater contact as soon as you receive your call sign.
When it comes to HF, it is a little more universal and generic. With HF there is truly no local flavor because the world is your neighborhood. Listening is still a great idea. You will learn the nuances that occur between VHF/UHF and HF. A lot of HF is about just making contacts and making a simple exchange. However, there are some interesting nets to get involved with and a lot of preparedness activities to dive into.
When looking for nets to listen to I recommend netfinder.radio. It allows you to see what is happening right now or search by various criteria. A good source for contest information is the WA7BNM Contest Calendar, and for special events check out the ARRL Special Event Listing. Aside from that, just spin the dial and see what you can find. Always keep in mind the FCC Band Plan and your operating privileges before transmitting.
Another source of street knowledge is your local club. I know, I have beat this drum a lot. But clubs are where the hobby, for the most part, lives and grows. This is where you can see that you’re not alone on a deserted island.
There are other operators who are deeply entrenched in the hobby and would love to impart their years of experience to you either one-on-one or via group presentations. You may also find club and community events to be involved in. Club listings can be found at the ARRL Find-A-Club Tool or the QRZ Radio Club Database.
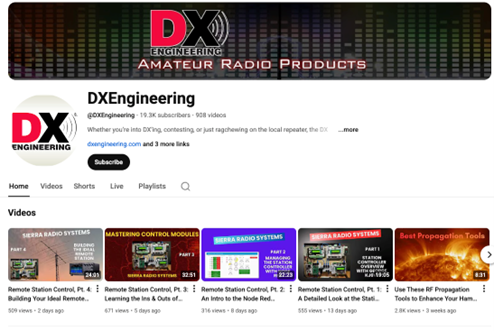
The final source we will discuss today is YouTube. Again, just like any other resource, you will need to vet the information you receive. You can find a vast array of information on many popular ham radio topics, either as detailed explorations or high-level generic overviews. There are also a wide range of content creators, so you should be able to find one that has a style you like. I recommend that you find a good selection of sources who you can trust to provide accurate information. The DX Engineering YouTube Channel, for example, offers hundreds of videos covering just about every amateur radio topic under the sun, including the sun.

DX Engineering YouTube Channel. (Image/DX Engineering) Please study diligently for your test so that you can answer whatever question is given to you, but remember, the book is the foundation on which you build your collection of knowledge and wisdom to become a solid ham radio operator.
Until next time, 73 de AC8OW
The post How Do You Become a Good Ham Radio Operator? Listening is a Great Start. appeared first on OnAllBands.


, K-1 connector (right)")


")
